If you've ever driven past a tall, single-column tower carrying power lines or telecom equipment, you've seen a monopole in action.
These structures are widely used in power transmission, telecom, and infrastructure projects - and erecting them correctly is both a science and a skill. Understanding how monopole erection works helps engineers, contractors, and project managers plan better, avoid costly errors, and ensure long-term structural safety.
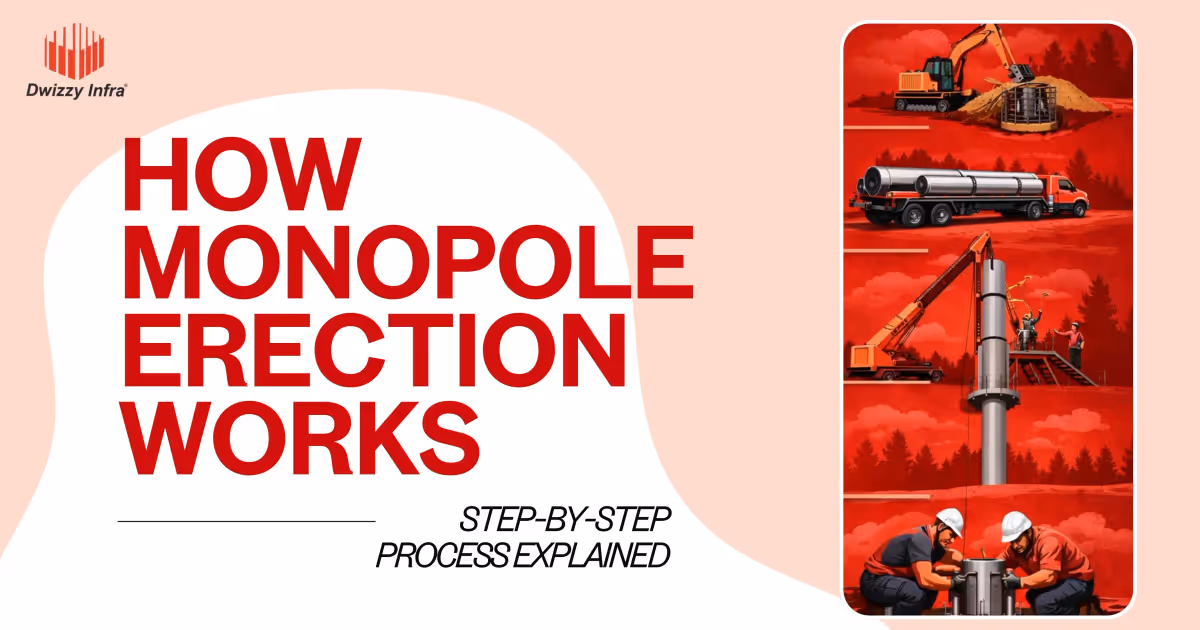
At Dwizzy Infra, we specialize in high-quality monopole erection services across power transmission and infrastructure projects. Here's a clear, step-by-step breakdown of how the process actually works on the ground.
Step 1: Site Survey and Foundation Design
Every successful monopole erection begins long before any steel goes into the ground. Engineers conduct a thorough site survey to assess soil conditions, topography, load requirements, and environmental factors. Based on this data, a pile foundation or anchor bolt foundation is designed to support the monopole's weight, height, and expected wind loads.
Getting the foundation right is non-negotiable. A poorly designed base compromises the entire structure.
Step 2: Foundation Construction and Curing
Once the design is finalized, excavation begins. Reinforced concrete foundations or driven pile foundations are installed depending on soil type. Anchor bolts are precisely positioned according to the monopole's bolt circle pattern. The foundation must then cure fully - typically 21 to 28 days - before any erection begins. Rushing this stage is a common and dangerous mistake.
Step 3: Material Inspection and Pre-Assembly
All monopole sections arrive on-site and undergo strict quality inspection. Engineers check dimensions, weld quality, coating integrity, and compliance with technical specifications. Flanged sections are laid out and pre-assembled horizontally on the ground, which allows teams to verify bolt alignment and fit before lifting - saving significant time and reducing risk.
Step 4: Crane Setup and Lifting Plan
Monopole erection requires precise crane selection. The crane capacity must account for the pole's total weight, height, and the distance from the foundation. A detailed lifting plan is prepared, including sling angles, pick points, and safety exclusion zones around the site. This phase is where experienced rigging and lifting crews become absolutely critical.
Step 5: Pole Erection and Vertical Alignment
The crane lifts the assembled or bottom section of the monopole and carefully positions it onto the anchor bolts. The team immediately checks vertical plumb using precision levels and theodolites. Any deviation from plumb must be corrected before proceeding. Nuts are tightened in a cross-pattern sequence to ensure even load distribution across the base plate.
Step 6: Section-by-Section Assembly (For Multi-Section Poles)
For taller monopoles, sections are lifted and joined sequentially. Each flange connection is torqued to manufacturer's specifications. Alignment is re-verified after every section is added. This is meticulous work - small angular errors at lower sections amplify significantly at greater heights.
Step 7: Equipment Mounting and Final Inspection
Once fully erected and plumbed, cross-arms, insulators, telecom mounts, or other equipment are installed. Earthing connections are made, and a final structural inspection confirms that all bolts are properly torqued, coatings are intact, and the pole meets design specifications before it's handed over for energization or commissioning.
Monopole Erection Process at a Glance
- ● Site Survey & Foundation Design — soil assessment, load calculations, foundation type selection
- ● Foundation Construction & Curing — excavation, anchor bolt placement, 21–28 day curing period
- ● Material Inspection & Pre-Assembly — dimensional checks, weld quality, horizontal ground assembly
- ● Crane Setup & Lifting Plan — crane capacity selection, sling angles, safety exclusion zones
- ● Pole Erection & Vertical Alignment — crane lift, plumb verification, base plate torqueing
- ● Section-by-Section Assembly — sequential flange connections, alignment re-verification
- ● Equipment Mounting & Final Inspection — cross-arms, earthing, bolt torque verification, handover
Conclusion
Monopole erection is a disciplined, multi-stage process where precision at every step determines structural performance and safety for decades. From foundation preparation to final inspection, no phase can be treated casually.
Partnering with experienced professionals like Dwizzy Infra ensures your project meets engineering standards, stays on schedule, and stands the test of time.
FAQs Related to How Monopole Erection Works
How long does monopole erection typically take?
Depending on height, site conditions, and foundation type, a single monopole erection can take anywhere from 2 to 7 days, excluding foundation curing time.
What foundation type is best for monopoles?
It depends on soil conditions. Pile foundations work best for weak or loose soils, while anchor bolt foundations suit stable, load-bearing ground. A geotechnical report determines the right choice.
What crane capacity is needed for monopole erection?
Crane capacity depends on the pole's total weight and height. Most monopole projects require cranes ranging from 50 to 300 tonnes. A structural engineer prepares a site-specific lift study.
Can monopoles be erected in all weather conditions?
No. High winds, heavy rain, and poor visibility make lifting operations unsafe. Operations are paused when wind speeds exceed safe thresholds defined in the project's lifting plan.
What are the key safety measures during monopole erection?
Key safety measures include exclusion zones around the lift area, certified rigging gear, operator competency checks, PPE compliance, and a pre-lift toolbox talk covering emergency procedures.